

How To Set Up A Baofeng Uv-5r
All of the listed models are practically identical, and differ only in the modernization of the cases. Setting upward the Baofeng uv-5r radio is quite different from the setting of a similar Kenwood TK-F8 station, the menu also differs in many points. Therefore, this article provides some guidelines for beginners. Information technology is best to explore the setting by following the menu items in sequence.
Walkie-talkie menu (the most important items are indicated in blueish):w
0. SQL Squelch opening threshold. Possible values are from 0 to 9.
ane. STEP Frequency stride adjustment (ii.5 / v / 6.25 / 12.5 / 25/50/100 kHz);
2. TXP Alter of transmitter power (low / high);
3. Relieve Save bombardment power in receive mode;
iv. VOX Voice control of switching on the transmission (off / on);
5. WN Selects narrow or broad bandwidth of reception / divergence during manual (5kHz / two.5kHz);
6. ABR Display backlight time in seconds;
7. TDR Turn on the mode of simultaneous reception of two frequencies (receiver А / В);
8. BEEP Audio accessory of pressing keys;
ix. TOT Transmission end time (select from xv to 600 s);
10. R-DCS Set digital subtone in receive manner;
11. R-CTCSS Set analog sub tone in receive mode;
12. T-DCS Set digital subtone in transmission mode;
thirteen. T-CTCSS Set analog sub tone in transmit mode;
14. VOICE Vocalisation confirmation of keystrokes;
xv. ANI-ID Transmit special ANI code at the beginning of transmission;
16. DTMF ST Setting the audibility of DTMF tones transmission;
17. S-Code Select i 5-digit DTMF code;
18. SC-REV Select frequency scan method;
19. PTT-ID Determines when the PTT-ID code is circulate;
20. PTT-LT PTT-ID code transmission delay, ms;
21. MDF-A Receiver A channel data display format;
22. MDF-B Same, receiver B;
23. BCL Busy transmission inhibit;
24. AUTOLK Automatic fundamental blocking;
25. SFT-D Repeater shift direction (+/-) or OFF;
26. Showtime Frequency offset value from 0 to 69.990 MHz;
27. MEM-CH Saving frequency to memory cell;
28. DEL-CH Delete channels;
29. WT-LED Standby backlight color;
30. RX-LED Backlight color in receiving mode;
31. TX-LED Backlight colour in transmission manner;
32. AL-Mod Operating mode of the "ALARM" function;
33. BAND Selects the UHF / VHF band;
34. TDR-AB Reception fashion of two frequencies A or B, or by the presence of a indicate (OFF);
35. STE Eliminate hissing sound at the end of the transmission (ON / OFF);
36. RP-STE Aforementioned, only when working through a repeater;
37. RPT-RL Repeater finish tone delay (x100 ms);
38. PONMSG Information shown on the brandish when switched on;
39. ROGER Broadcast transmission end sound betoken (ON / OFF);
xl. RESET Return to factory settings;
Menu operation:
1. Press the [Bill of fare] key to plough on the setup menu.
2. Movement to the desired menu detail using the [▼] and [▲] keys.
3. Press the [MENU] central again to alter the selected option.
four. Select the desired option value using the [▼] and [▲] keys.
5. Relieve the setting by pressing the [Card] key.
Walkie talkie display
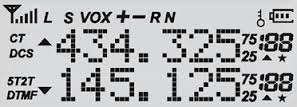
L - low power;
Southward - enable the reception of ii frequencies A and B;
Vocalisation - activation of the vocalism transmission control function;
+/- - repeater shift;
ST - turn on the analog tone;
DCS - enable digital tone;
Due north - turn on a narrow band;
R - Reverse function is on;
Primal symbol - key lock.
Purpose of all buttons
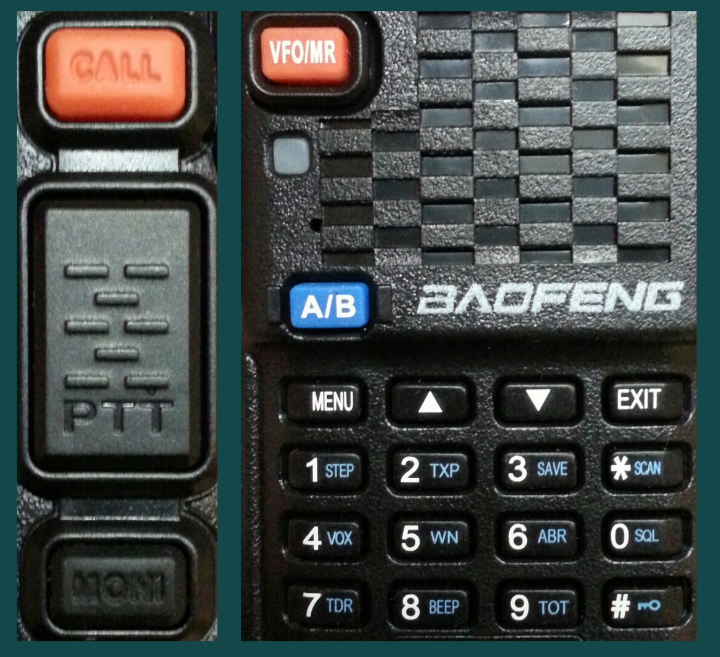
1. "Call" - Short press turns on the FM receiver. Pressing and holding information technology triggers an alarm (Alarm part).
2. "PTT" - enable transmission;
3. "MONI" - a quick press turns on the flashlight. Pressing information technology again causes the flashlight to flash. By clicking once again, plow it off. Long press disables the squelch.
four. "VFO / MR" - switching frequency and channel modes.
5. "А / В" - switches the frequency or channel of active reception (line A or B).
half dozen. "MENU" - entry into the radio carte, as well equally confirmation of irresolute settings or settings (in this instance, the key works equally "OK").
seven. "▲ ▼" - let scrolling through the menu items, likewise as selecting the desired channels or sequentially changing the frequency with a given step.
8. "EXIT" - used to exit the menu or to render the station to the original fashion, or to clear the not fully dialed frequency.
nine. Numeric keys allow y'all to enter the desired frequency or channel number. Besides used for quick admission to the primary card items (marked in blue). To do this, press the "Carte" button, and so the respective central.
Working with the most requested functions:
1. Function "ALARM"
To call a correspondent, you can use the "Alarm" role. Get to the menu and, in particular, to point 32. Here the default is "Site". Use the ▲ pointer to set up the "Tone" value. After that, past pressing and property the "CALL" push, the warning betoken will be automatically transmitted to your correspondent. To plough off the transmission of the alarm call, press the "Call" button once again.
ii. Changing RF power
For the convenience of switching the output power of the transmitter, a brusque press of the "#" push button is provided. Pressing information technology again will return the previous power. Even if the aqueduct is recorded with a certain power, it can likewise be apace changed (High / Low) by pressing this key. In this case, the symbol "50" appears or disappears on the screen of the device. It means low power. This symbol is not displayed at high power.
3. Scan function
In gild to get-go scanning, you demand to put the station in the frequency manner and and so adjust the frequency tuning pace through item 1 in the bill of fare. You can activate scanning past pressing and belongings the (*) push button. It is easy to stop scanning with the Exit push (brusque press). The scanning direction of the range can be easily changed past pressing the 《》 buttons. The scanning method changes in the 18th item of the main menu.
4. Keypad lock
It is carried out past pressing and holding the (#) key. Unlocking is achieved by the same push.
5. Dissonance suppressor (SN)
Aligning of the NR sensitivity is made through item "0" of the (SQL) carte du jour. The lower the value, the more sensitive the opening threshold of the FS. The value "0" ways disabling the SHP. The optimal value is from 3 to v. In case of intense interference, it is recommended to ready the WB to 6 - x. But, then, the receiver will ignore very weak useful signals.
half dozen. Vox function
Allows hands-free communication. The manual is activated by the sound of the vocalisation. This office is activated via carte du jour item 4 (ON / OFF). The threshold of the system is also regulated here. The highest sensitivity is achieved with a value of "1". But it is worth remembering that with such a sensitivity, the walkie-talkie will turn on transmission at the slightest vibration and shaking. Therefore, the sensitivity must exist selected experimentally.
seven. Frequency tuning pace
Set using item 1 of the menu. Any desired value is selected from the possible. The standard default is 25 kHz. When tuning the radio to PMR channels, you lot need to set the value to vi.25 kHz.
eight. TOT function
It is needed to limit the time of the station in the transmission mode. This is to avoid overloading the channel or frequency for ethical communication reasons, and to prevent station overheating and premature bombardment belch. Configurable through item 9 of the menu. Usually, the maximum value is ready to 600 seconds.
9. Role of simultaneous reception of ii frequencies (channels) TDR
You tin can prioritize either channel A or channel B, or enable simultaneous reception (A / B). Installed through bill of fare item 7.
10. Setting up the FM receiver
The receiver is switched on by pressing the "Call" button. Tuning to broadcast stations is washed by scanning (Scan push button), or by direct frequency entry. Since the receiver has a dual range (65 - 75/76 - 108 MHz), you can switch bands using the А / В push. When a indicate appears on the active channel (frequency) of the radio, the FM receiver turns off, and resumes operation after a brusk time if the station does non receive signals from subscribers.
11. Scanning CTCSS / DCS Tones
We become to item xi of the menu and activate any analog tone. Then, on the auxiliary radio, we printing the manual on the same frequency that is assail the radio to be tuned. Now press the "Scan" push. The radio, in the presence of a signal, starts searching for the subtone of the transmitting radio. Scanning stops when a tone is plant. The search for a digital tone is carried out in the aforementioned style through the 10th menu particular. Please note that the radio must transmit a tone so that the receiving side can find it.
The rest of the functions (BEEP, ABR, TXP, Salvage) are enabled with quick admission to the corresponding menu items by pressing the (Nenu) + number cardinal in succession.
Examples of
Recording frequency to memory:
1. We dial the desired frequency;
2. Go to the menu;
3. Right the parameters of the hereafter channel - TX power, WB level (SQL);
4. Select item 27 with arrows ▲ ▼;
five. Press the "Card" push again;
6. Select the retentiveness prison cell number with the arrows ▲ ▼;
7. Salvage the selected value past clicking "Menu";
8. Leave the menu by clicking "Exit";
Frequency recording with repeater shift:
1. Nosotros dial the desired frequency;
2. Go to the card;
3. Set up the required power of the transmitter and the level of operation of the SHP;
4. Select item 25, press "bill of fare" again;
5. We actuate the direction of the frequency shift during transmission ("+" or "-");
6. Become to bespeak 26 and select the shift value in megahertz;
7. Go to point 27 and save the channel every bit described above (also see the note);
Delete channels:
one. In the bill of fare, select item 28;
two. Press "Menu" and with arrows ▲ ▼ select the jail cell number to be deleted;
three. Delete the selected channel with the "Menu" push button;
4. Leave the menu.
Recording of permitted frequencies:
It is best to delete all preset channels at once, as they contradict the immune areas. The easiest to record is an LPD band with 69 channels. The start aqueduct with a value of 433.075 MHz. The second aqueduct and subsequent ones are recorded in 25 kHz steps. Y'all can also record 14 channels FRS band, 8 channels PMR. In the latter case, the tuning pace is set at 6.25 kHz. The outset channel is 446.00625 kHz.
Note: When recording a aqueduct, tone protection (CTCSS or DCS, etc.) tin can also be set. Subtones are set in guild non to hear foreign groups using the same radio frequencies *. Selects either analog CTCSS or digital DCS tones. In this example, y'all need to set them in the T-CTCSS transmission and R-CTCSS (analog tone) or digital (T-DCS; R-DCS) reception mode via card items 10-xiii. Confirmation of the entry is carried out by pressing the "Carte" key. You need to know that the tones can exist set to either analog just or digital. You cannot select analog + digital code for reception or transmission at the same fourth dimension. But y'all tin can put an analog / digital code for reception, and a digital / analog code for transmission, respectively.
*Attention! Installing CTCSS or DCS does non guarantee the confidentiality of conversations. A subscriber with subtones turned off will hear everyone on the current channel.
Near of the settings are gear up by default, which is sufficient for normal utilise of the radio. Therefore, they exercise not need to be changed. The primary features that demand to be adjusted are:
ane. Set the required power,
2. Shop channels in memory,
iii. Gear up the squelch threshold.
Source: https://punisher.com.ua/en/kak-pravilno-nastroit-baofeng-uv-5r-uv-5ra-uv-5rb-uv-5re-bf-f8pofung/
0 Response to "How To Set Up A Baofeng Uv-5r"
Post a Comment